Sunday, November 6, 2011

Done! `

Ok, I'm calling this project done. Yes, there are still some little things we are arguing over with the company but they are mostly cosmetic things.

Check out my attempt at a view matching the original designers' concept drawing:


Blurry picture with the buffet thing in it.

We love the new kitchen! We've been moved back into and using the new kitchen for a couple of weeks now (minus a week-long belated honeymoon in Hawaii).

Thanks everyone who helped make this possible.


Monday, October 10, 2011

Painting!

We are almost done! Sorry for not posting for awhile but things have really slowed down for the past week or so while the last couple of things on our punch list get fixed. Supposedly everything will be fixed today.

In the meantime we decided to start painting. This was the one thing that wasn't a part of the services offered by the one-stop-shop we used for the design and installation. They did everything else, including patching lots of holes in the drywall and even re-texturing them. As a result the walls and ceiling had lots of patches of different shades of white. Unfortunately we'll probably have to get the entire ceiling repainted since it will be almost impossible to match the paint color we currently have and just pain the impacted areas. So bear with us since that might take a few months to schedule someone to come do that.

In the meantime someone was busy this weekend masking everything off and repainting it:

Cathe after masking pretty much everything.

Color! Cathe in the midst of adding some color to the kitchen.

Friday, September 30, 2011

Lights, Appliances, Disposal! We're almost done!

Wow, things are really starting to wrap up now. There isn't really anything left to do expect make a final "punch-list" of things to fix before we sign-off that everything is done. A lot of seemingly little things were accomplished over the last couple of days.

Our tile floor and back splash have been sealed and are done

The tile floor.
Back splash with new outlet.
The electricians must have been by today to finish up all of our light installations. We now have our new pendant lights installed and they look better than expected.

Pendant/Accent lights.
Our under cabinet lights were also installed.

Buffet with under cabinet lights on.

All of our appliances have been re-installed. Unfortunately our dishwasher door has started squeaking.
A dark picture trying to show off the under cabinet lights

Apparently one part of the design was to extend the cabinet above our microwave a bit. Unfortunately that covers the exhaust vents for the microwave so that has to be fixed somehow.
View of the cabinet over the microwave. Notice how the other  door is covering the vents.

Our new sink and disposal are all hooked up.

Pork Chop doing an inspection on the new plumbing.
 The next step is preparing our punch-list of things that need to be fixed. Our preliminary list:

  • Fix the microwave so the vents aren't covered up
  • Fix the seams in the granite
  • Stop the squeak in the dishwasher door
  • Level the oven
  • Make sure all the drawer faces are in line.
If you have any other suggestions on things to fix/test let us know.


Monday, September 26, 2011

Appliances homeless no more

September 26, 2011

Today we returned home to find our appliances homeless no more.  Instead of oddly hanging out in the living / dining room, the fridge, stove and dishwasher all happily sat snugly in their familiar pockets of the kitchen.  We need to work with Kevin to refine a few elements - the fridge tilts to the right and the stove tilts downward to the backside.

Also, the floor-to-ceiling plastic tarp that served to separate the kitchen and the living / dining room is gone. We can really tell how open the area feels/looks now.  And with the half wall gone, it makes a fantastic difference! We are super happy with the layout change.

We're still curious about the tile floor as it wasn't cleaned or sealed before moving the appliances back.  Seems like a step might have been accidentally missed. Hopefully we run into Kevin on Tuesday and get things take care of before the project concludes.

By the way, tomorrow (Sept 27, 2011) is when they will start building the new 21-story condo next door (in the Football stadium parking lot).  We have 40 days of pile driving ahead of us.  As a point of documentation, Jeff and I took pictures of our kitchen, especially the granite, to show that it has no cracks or damage prior to the start of the Condo project next door. Hence, that's why you see the yellow Post-it note that Jeff's holding.  It say Sept 26th... Here's to no issues for our kitchen and for our entire condo building (approximately 100 units encompassing 6 stories...yes, the new building will dwarf us horrifically).

More pictures...


Back splash looks "blah" as we don't think it's done yet.


Actual seam line on the main peninsula.
The other one is above the dishwasher.


All this in one week?!?!

Week of Sep 19 - 23

This week, we really saw the kitchen come together. Highlights include:
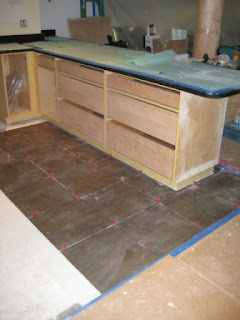
  1. Floor tile laid and grouted
  2. Tile back splash laid and grouted
  3. Bonus cabinet roughed in and mudded to create a flush-to-wall built-in look - neat!
  4. Cabinet fronts added
  5. Cabinet slow-close brackets added...these rock!
  6. Faucet installed (and functioning)
  7. Garbage disposal installed...Had to put it on the other side of the sink...ARG!
  8. Glass inserts added to Buffet 
  9. Hardware installed
  10. Microwave installed...Needs to be redone as the top-vents are covered by the upper cabinet...ARG!

First, the floor tile was installed.  We chose 18" x 18" tiles that were a warm brown/grey color (it's hard to describe, but it won't show dirt or wear easily - yea!).  We have 1/8" grout lines in an appropriate "Espresso" color.  Go Team Starbucks!  


A HUGE tile saw that was on our balcony
Lots of water for the tile process

Pork Chop thinks the tile is GREAT, especially for back scratching!
Second, the tile back splash was installed. We added a special back splash behind the wall with the stove and microwave.  The hope was to offer another bold visual element when sitting in the living or dining room and looking into the kitchen.  We chose a cool slate grey mini-tile pattern.  While most back splashes run horizontal, we opted for the vertical layout.  This would mimic the vertical grains of our bamboo cabinets.  And boy does it work well together!  The grout is done. A coat of sealer and/or a general wash off may be needed - as we don't think it looks done yet. Haven't had a chance to chat with Kevin yet about it.

Back splash without the silver-grey grout

Third, the bonus pull-out cabinet and wine cubby were installed.  AKA, this is the hole in the wall where Pork Chop went exploring.  It's great to have the cabinet roughed in.  All in all, we like this feature a lot.  We do wish 2 more wine cubbies could have been added - we weren't sure if there was enough room in the design phase so we downgraded to a 6-bottle cubby.

Wine Cubby and Pullout Storage.  A new thermostat for the wall heater is to the right.
Fourth, check out this killer kitchen faucet (Dad, don't worry.  It's a Delta!!!!).  The bowl on the right is a bit bigger and deeper than the left. That detail proved to put a kink in the garbage disposal install, as now the disposal must go on the LEFT side of the sink. As I (Cathe) am the official dishwasher of the house, this will be a BIG adjustment for me.  Hope the adjustment process is quick and painless.

HUGE Faucet head with Pull-down sprayer - Love it!
Check out the new hardware. Jeff was inspired to have long handles on the European slab-style drawers.  Looks pretty cool, don't you think!
36" long cabinets - Top ones are 6 inches tall. Bottom two are 12" tall. 

Lastly, here a few fun pictures of the finished Buffet.  The glass inserts have texture that resembles a light Seattle rain on an office window. We thought it would be funny.
Buffet wall with Cabinet fronts and hardware.
The under mount lights are the last piece.

Seattle Rain...don't you agree?!


Sunday, September 18, 2011

Emergency Cat Extraction

Help! 
The last cabinet to get installed in our new kitchen is a wine rack and liquor cabinet type-thing. The way the designer figured out how to do this was to insert it into the wall in the corner where we just knocked down the wall dividing the kitchen and the living room. When we cut into the wall we found some mold so we had to cut the hole a bit bigger so Cathe could get in there and scrub the wall down and repaint it.
Why does she look like she enjoyed scrubbing mold off the wall and then repainting it?

The mold!


We were worried about someone getting in the hole in the wall during construction so we covered it with paper and some painter's tape. This wasn't a problem. Then we got our counter top installed on Friday and this apparently gave Pork Chop the height she needed to get in the hole. So while we were watching a movie Saturday night we heard a strange noise. 20-30 minutes later we noticed Pork Chop was missing.
What is left of the original paper guard.

The hole with the new counter.

What followed was an entertaining yet stressful 40 minutes of trying to figure out how to get her out the wall. This included using scrap cardboard, our ironing board (Cathe's idea), and a reusable shopping bag rigged up with belts (my idea). What eventually worked was sticking a step ladder down in the hole and putting some treats just outside the hole so she could climb out.
The rescue ladder.

Now the hole is covered up super-secure so no one can get in there again.


Friday, September 16, 2011

Uba Tuba is Installed!

Our Uba Tuba counter top was installed today. (Or should it be plural counter tops since there are actually counters on the kitchen counter and the buffet?) It is amazing how much more the kitchen looks "completed" after this installation. The color exceeds my expectations and looks great under our lights and should look even better once our pendant lights are installed.

The buffet with the new counter top.
Here is a better picture that shows the color in the granite a bit better. You can see how much tearing down that wall opened up the kitchen. Notice the 12-inch overhang on the right of the counter so we can actually have it be a functional counter where people can sit and eat or drink, or eat and drink.
A better view of the Uba Tuba.


A wider view of the whole kitchen,
This is a follow-up from yesterday. This is what the box looked like that our lights showed up in yesterday. The condition of the box scared us until you opened it up and saw that it was filled with some sort of alien, green, super-duper bubble wrap. Hopefully everything is ok. It looks like it should be.
Our accent/pendant lights.
If anyone wondered why we wanted so many Home Depot gift cards, this is one reason. We stocked up on all of our switches, outlets, switch plate covers a new thermostat and a dimmer.
Parts galore!